Unitree Interfaces
Obelisk provides interfaces to communicate with various robotic hardware, as well as simulation environments aimed to mimic hardware as closely as possible.
Currently supported systems include the Unitree Go2 quadruped and the Unitree G1 humanoid.
Finite State Machine
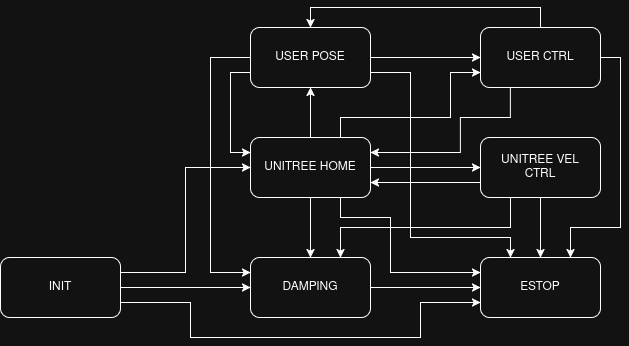
The Unitree Interfaces implement a finite state machine (FSM) to facilate easier, safer testing. A downstream project may often want to implement a FSM of their own, which controls the flow of the downstream control. This FSM should be handled downstream; we present a fundamental FSM implementing key testing pieces such as an ESTOP, Damping mode, interaction with the default Unitree locomotion controllers, a User Pose, and the user defined controller. The FSM is given by the following graph:
Controlling Robot Behavior via the Joystick
Currently, the FSM and velocity commands can be sent to the robot through the joystick. By default, the joystick implements the following button behaviors:
Right Trigger: ESTOP
Left Trigger: DAMPING
Left Stick: Velocity Commands (vertical -> x, horizonal -> y)
Right Stick: Yaw Rate Command
Left Button: Layer 1
To avoid having the default FSM conflict with any user-specified FSM operating on the same controller, the default FSM is implemented on a different ‘Layer’ - the layer button must be held down, then the following buttons will trigger (when valid) transitions of the default FSM:
DPad Left (L1): USER POSE
DPad Right (L1): UNITREE HOME
DPad Up (L1): UNITREE VEL CTRL
DPad Down (L1): USER CTRL
where L1 refers to Layer 1, i.e. the layer button must be held down. Additionally, all buttons not passed to the fsm are passed through on a separate joystick node (/obelisk/g1/joy_passthrough by default). It is recommended that the user subscribe to this topic to use the controller, rather than the joystick topic (default /obelisk/g1/joy), to avoid interference with the fsm.
All of these buttons can be remapped as desired in the setup yaml. The relevant pieces live in two places:
The top-level
joystick:block configures the raw ROSjoy_nodethat reads hardware joystick events and publishes them on/obelisk/g1/joy. Onlyon,pub_topic,sub_topic, and standardjoy_nodeparameters (device_id,device_name,deadzone,autorepeat_rate,sticky_buttons,coalesce_interval_ms) live here.The
obelisk_unitree_joystickcontrol entry (undercontrol:) translates raw button events into FSM transitions and velocity commands. Its remap settings — button bindings and scale factors — go in its ownparams:block.
A complete config showing all available options (omitted options take defaults):
# 1. ROS joy_node — raw joystick → /obelisk/g1/joy
joystick:
    on: True
    pub_topic: /obelisk/g1/joy
    sub_topic: /obelisk/g1/joy_feedback

# 2. Obelisk unitree-joystick controller — buttons → FSM/vel commands
control:
    - pkg: obelisk_unitree_cpp
      executable: obelisk_unitree_joystick
      params:
          v_x_scale: 0.5
          v_y_scale: 0.5
          w_z_scale: 0.5
          axis_threshold: -0.1
          menu_button:              7  # MENU
          unitree_home_button:    116  # DL1
          user_pose_button:       127  # DR1
          low_level_ctrl_button:  128  # DD1
          high_level_ctrl_button: 117  # DU1
          damping_button:          12  # LT
          estop:                   15  # RT
          vel_cmd_x:               11  # LY
          vel_cmd_y:               10  # LX
          vel_cmd_yaw:             14  # RY
          layer_button:             4  # LB
      # publishers/subscribers/timers as in the example configs
scale parameters refer to the multiplicative factor under which joystick inputs are scaled when passed to the unitree controller (or if the user controller is subscribed to the same message).
Buttons are passed as integers, under the following map:
LT = 12     // 2 + AXIS_OFFSET,
RT = 15     // 5 + AXIS_OFFSET,
LB = 4,
RB = 5,
X = 3,
Y = 2,
A = 0,
B = 1,
DR = 27     // 6 + AXIS_OFFSET + NEG_OFFSET,
DL = 16     // 6 + AXIS_OFFSET,
DU = 17     // 7 + AXIS_OFFSET,
DD = 28     // 7 + AXIS_OFFSET + NEG_OFFSET,
LX = 10     // 0 + AXIS_OFFSET,
LY = 11     // 1 + AXIS_OFFSET,
RX = 13     // 3 + AXIS_OFFSET,
RY = 14,    // 4 + AXIS_OFFSET,
MENU = 7,

// Modified by layer button
X1 = 103    // X + LAYER_OFFSET,
Y1 = 102    // Y + LAYER_OFFSET,
A1 = 100    // A + LAYER_OFFSET,
B1 = 101    // B + LAYER_OFFSET,
DR1 = 127   // DL + LAYER_OFFSET,
DL1 = 116   // DR + LAYER_OFFSET,
DU1 = 117   // DU + LAYER_OFFSET,
DD1 = 128   // DD + LAYER_OFFSET,
Note that to avoid conflicts between button indices and axis indices (and issues with the DPad), we have added offsets LAYER_OFFSET = 100, to buttons on Layer 1, AXIS_OFFSET = 10 to axes, and NEG_OFFSET = 11 to elements of the DPad which report negative values when pressed.
Standard Pipeline for High Level Control
Ensure the relevant flag is
robot -> is simulated: False -> params: -> init_high_level: True.Turn the robot on.
Once robot signifies ready state (zero torque mode on G1 humanoid, standing up on Go2 quadruped), run fsm.
Start with INIT -> DAMPING, and follow up with DAMPING -> UNITREE_HOME (for the G1), or proceed directly with INIT -> UNITREE_HOME (for the Go2).
Proceed with UNITREE_HOME -> UNITREE_VEL for velocity control with the unitree default locomotion controllers.
Standard Pipeline for Low Level Control
Either omit or ensure the relevant flag is
robot -> is simulated: False -> params: -> init_high_level: False.Turn the robot on.
Once robot signifies ready state (zero torque mode on G1 humanoid, standing up on Go2 quadruped), run fsm.
Start with INIT -> DAMPING, and follow up with DAMPING -> USER_POSE (for the G1), or proceed directly with INIT -> USER_POSE (for the Go2).
Proceed with USER_POSE -> USER_CTRL for user defined controllers.
Debugging
You can also check what the default button mappings are by running:
obk-launch config=unitree_fsm_debug.yaml